With the holidays almost upon us, I have been deluged by emails and articles offering advice about how to eat healthier during the holiday season. Due to my history with chronic candida problems, eating anything with sugar, dairy or gluten is not really an option. My body does not handle sugar, dairy or any chemicals or additives at all, and knowing that I will be sick the next day is a great deterrent to eating holiday food. So, what do I do when faced with family or dinner parties that I need to attend? Here are a couple tried and true approaches:
- Most of my friends and family know that I’m “special” when it comes to food. They are kind and courteous and consult with me before the party and we come up with a game plan to have something I can eat. I have gotten over my embarrassment of asking what is on the menu and requesting something special.
- If that’s not an option and I know it’s a social event where I will probably not have a lot to eat, I always grab a bite beforehand so I’m not hungry. And, I always ask the host if I can bring something, which brings us to the next item.
- Bring something you can eat that you can share with others. There are many wonderful holiday dishes that are gluten and dairy free and even paleo. If it’s delicious and healthy people are very grateful that you brought enough to share!
Today, I would like to share a recipe for my favorite paleo pie crust that will work with any pie. It has great flavor and texture and is very simple to make. I’ve been using it quite a lot in pumpkin pies this past month. I just can’t pass up a good pie pumpkin :).
This recipe is based on a great recipe that I found online: http://thehealthyfoodie.com/paleo-pie-crust. However, I have customized and simplified it for my needs so that I can whip this up in no time flat. Now, there are a couple things to know about pie crusts in general:
- You will need a food processor. You can make it by hand, but it will take forever and probably not turn out as well. Food processors are a Godsend when it comes to pie crusts, and have so many other uses in the kitchen as well.
- You will need to do a little bit of prep in advance to make life easy. Many pie crusts require the fat (coconut oil in this case) to be very cold and many also require ice water. You can pop in a measuring cup of coconut oil and a separate one of water into the fridge about an hour or more before you get going. I usually put the coconut oil and water into the fridge the night before and then it’s ready whenever I need it.
Here’s the recipe for two regular crusts or one large crust with a bit left over:
1 cup almond flour (if you want to substitute another nut like cashew or macadamia, simply grind up 1 cup of nuts in your food processor until it turns into a meal)
1 cup coconut flour
1/2 cup tapioca starch
1/2 tsp Himalayan or fine sea salt
1 cup coconut oil, frozen
1/4 cup icy cold water
1 egg
1 tsp apple cider vinegar
Prep: Refrigerate coconut oil and water for at least one hour until icy cold.
- When you are ready to make the crust, combine almond flour, coconut flour, tapioca starch and salt in the bowl of your food processor. Pulse for a couple seconds.
- Take the coconut oil out of the refrigerator, pry or slide it out of the measuring cup onto a cutting board. Using a sharp knife, cut the coconut oil into small pieces, about the size of a large pea. Place them into the food processor and pulse until they are broken up evenly in the flour.
- Add 2 Tablespoons of cold water, egg and apple cider vinegar. Pulse until the flour starts to make a dough – it will start clumping up in the bowl and become moist. If you need to add more water, do so 1 Tablespoon at a time until the dough starts clumping – you don’t want it to be too moist.
- Take the dough out of the bowl and roll into a ball, making sure the moist areas are evenly distributed.
- At this point you have two choices. If you’re making the pie now, you can put it in your pie dish and make your filling. If you are making in advance, you can roll the ball in plastic wrap and store in the fridge for up to a week. Be sure to take it out of the fridge and let it soften up for an hour to room temperature before you bake with it.
- To make a pie, grease your pie dish with coconut oil and press the pie crust right into the dish with your fingers. You can flute the crust at the top as well.
- Put the filling right in the crust. It doesn’t need prebaking.
- If baking for more than 30 minutes, I recommend placing foil around the edge so that it doesn’t get too dark.
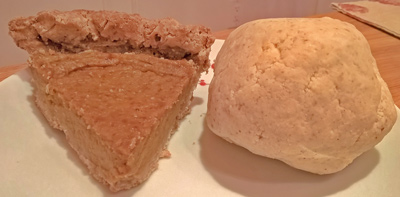
Here’s a photo both of the finished product (pumpkin pie) and the dough itself.
